Tuning 1 string per key makes it easier to tune, compared to regular pianos, which often have 3 strings per key for most of the keys. A smartphone app can easily give accurate pitch feedback on a single string.
That is why we believe you can tune your Keybird yourself ! We recommend an app called Pano Tuner, as it is free, and works well.
A chromatic tuner app will suggest the mathematically correct tuning frequencies of equal temperament tuning. For example it will tell you A440 Hz for the note A4 is correct (see overview of the key numbers in the image below), 880 Hz for A5 and 1760 Hz for A6. If you compare that with the Hz values we suggest for the Keybird X1, you will see that we have higher Hz values for the high notes, and lower Hz values for the low notes. That is because if a phenomenon called inharmonicity. Due to the thickness of the steel string, the “knots” of the waves are not a point but actually have a “length”, meaning that the wavelength between two such knots is slightly shorter compared to the theoretical wavelength. The shorter the wavelength, the bigger the effect of this (higher pitch). For the first overtone it can for example be 2 cents of a semitone off, for the second overtone it will be more than 4 cents off.
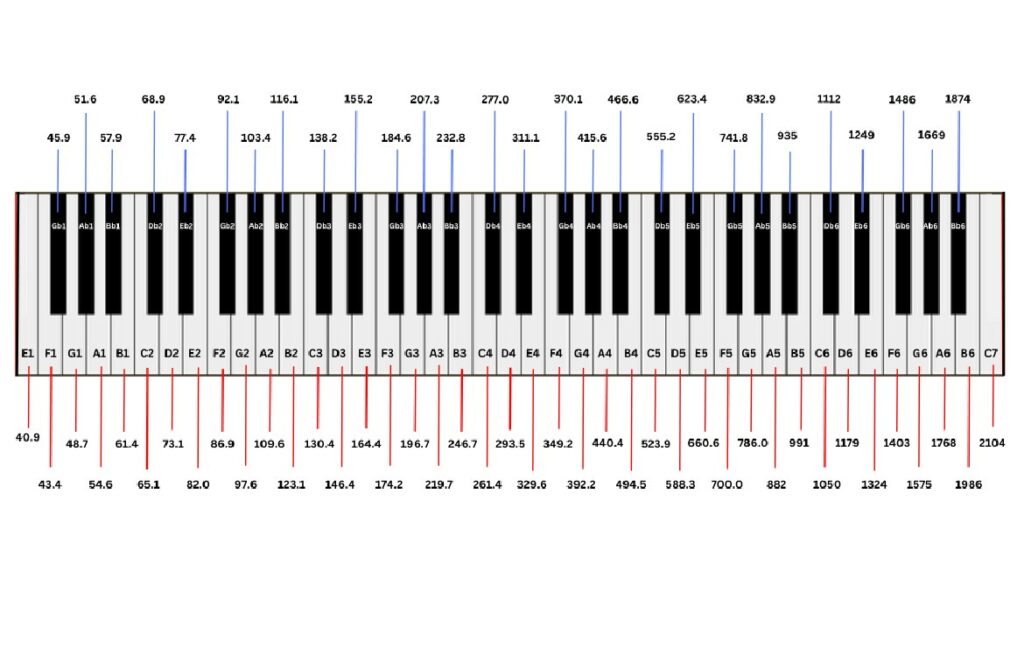
On the key overview image below, you can see our suggested frequencies for every key. Please note that for the higher keys it will be very difficult to get this exact number. In the videos below we show how to use the app and do this more quickly, using a deviation from the exact tone using the green and red zone in the app (Pano Tuner). It is up to you what you prefer to do: tune according to the frequencies with the downloadable image (download the PDF at the bottom of this page) or using the app zone to gradually stretch up in the high notes and stretch down in the lower notes. We know by experience that the zone method is quicker, and accurate enough. The zones are shown here:
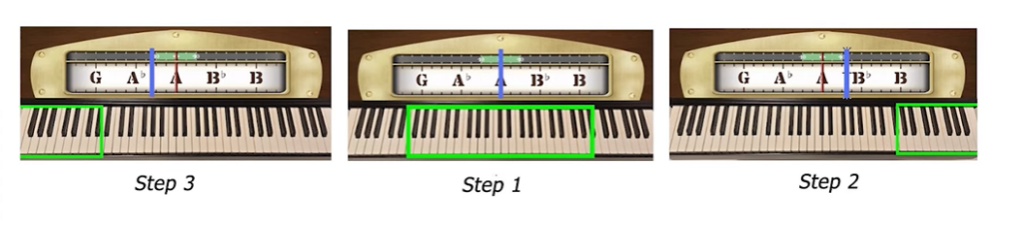
The blue line indicates where you need to have the “cursor”. Meaning that you actually tune it too high in the high notes, and too low in the low notes. The transition of the zones should be gradual, meaning that the upper notes of zone 1 (step 1) can already start to deviate into the right-hand side of the green zone and the lowest notes in zone 2 should not be on the end of the green zone like indicated on the picture. Starting with A-440 and going all the way up, then going from A-440 gradually downwards.
Depending on how much tuning is required, the tuning procedure can be broken down in a Quick Tuning (less precise) and a Fine Tuning. If the tone is outside the green zone for the middle keys (when outside, it becomes a red zone), quick tuning and then fine tuning is recommended. If the middle tones are close to accurate (within the green zone), you can skip the Quick Tuning procedure and go to fine tuning instead.
In general, a single string per key instrument is also more tolerant for being slightly out of tune. Two strings which are supposed to be exact same pitch will immediately create a sound which sounds out of tune when they are even very slightly differently tuned (pressing a single key), whereas the same inaccuracy will not be noticeable between notes with single string per key.
In the following videos we will explain the above in practice. It is useful to check both videos. Once you get the hang of this, you will not need the videos anymore, we hope 😉
Quick Tune your Keybird X1:
- Download Pano Tuner (mind the spelling, it says “pano”, not “piano”) App store or Play store
- Using your tuning lever, starting from A4 (440Hz) and moving upwards (to the right) tune all the notes a bit higher, around the right side of the green area
- Tuning up is clockwise, tuning down is anti-clockwise
- Be gentle-otherwise strings may break! never go more that a semitone over.
- Remember the “beer tap” motion to tune a little amount down, pulling the tuning lever gently towards you. Actually turning the tuning lever often results in too big jumps.
- When you’re done with the top of the keyboard, go back to A4, and make your way down the same way
- E3 and below (copper wound strings) – start to tune the notes exactly, not higher
- F2 and below – start to stretch the tuning down to just below the green zone (each note gradually lower and lower in the green)
Fine Tune your Keybird X1:
Fine tuning works just the same way as quick tuning, it’s just a second, more accurate “pass” on all the strings of the Keybird.
As a further reference, please download our guide with the suggested hertz values for fine tuning your Keybird:
If you have any questions or doubt or comment and troubles to this, please let us know 🙂
info@keybird-instruments.com